The Story of the Bog Queen
by Janina and Joerg Walzenbach
Version 1.1 - 07 January 2011
Figure 1 - taking the Bog Queen home with us
The Super Door or how to turn wood into turf
This is the story of the Bog Queen. The Bog Queen is a Lance 915 truck camper from 2001 (she was built in November 2001, which makes her a 2002 model). Now let me tell you how this all came about.
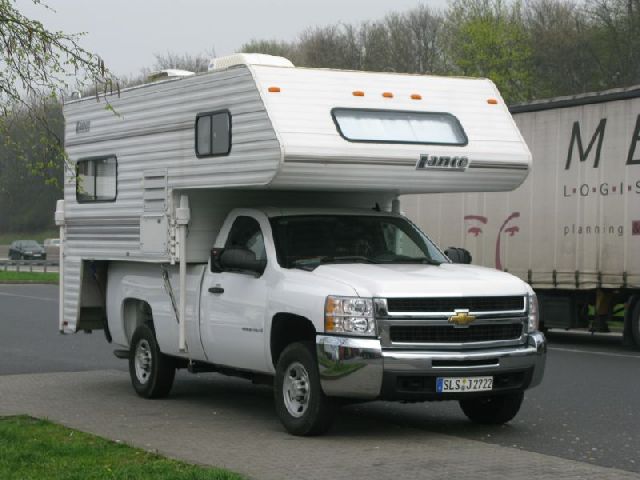
The story begins on a day in April, 2008, on the parking lot of the visitor center at the old railroad station in Kingman, Arizone. We had parked our Cruise America class C rental RV next to a veritable fullsize truck camper with basement on a righteous truck camper:
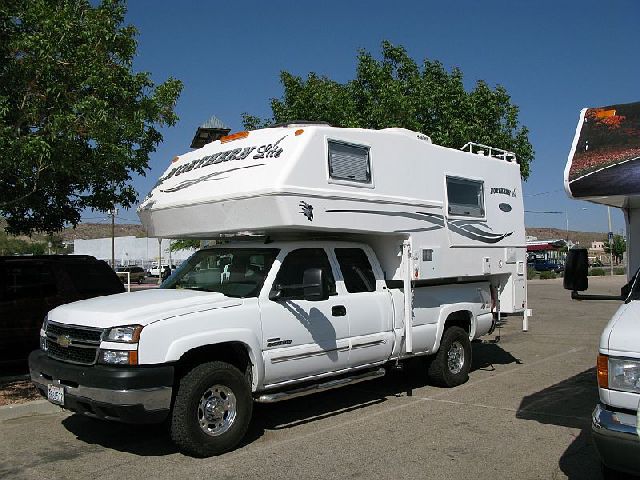
Figure 2 Kingman, Arizona
That marked the turning point of our relationship with truck campers. We had been contemplating the idea of a travel trailer or a motorhome. And we had looked at a few dozen floorplans with or without propulsion. None of these really did it for us.
The rental class C motorhome was intended as a test ride to find out how we liked the RVing lifestyle. The Northern Lite camper parked next to us looked much lake our family home in Germany. That would probably not work well back home, with the limited space and narrow roads of Europe. But "Must Have" was written across our faces, and we used the remainder of our vacation to gather as much information as we could about truck campers in general and american made truck campers in particular.
Back home we registered with the german pickup-camper forum (www.pickup-camper-forum.de), and the next thing that happened was that we were invited to visit their annual rallye in Laubach. There, we were able to look at a number of truck campers, meet many friendly and open-minded people. We were welcome even without a truck or a camper. Whoever wants to own a truck camper in Germany is well advised to make himself acquainted with that forum.
After that, we had traveled beyond the point of no return. We were bitten by the truck camper bug. Chronically, and untreatable so far.
Then we started collecting. Information about truck campers, truck camper manufacturers, pickup trucks, legal background, instructions for importing goods from the United States to Europe, LPG regulations, rules and regulations for the registration, manucaturers of refrigerators, rear axle loads, and so on. For a complete morning we had the german importer of Nordstar campers advise us (Nordstar campers are made in Scandinavia. Not to be confused with Northstar). I believe we would have bought one on the spot. Incuding hot water heating and all bells, horns, and whistles. If it hadn't been for the wallet issue. Because one property is not true for Nordstar campers: cheap, they are not.
We went to Bad Kissingen to see Europe's largest fourwheel fair, "Abenteuer Allrad". There, we looked at everything there was to look at. Twice.
Slowly emerged a definition of what we really wanted: an american made fullsize pickup truck which would fit inside our standardized german garage, with a "small" american camper on it, which wouldn' use too much of the truck's payload. One might think that the relatively large selection of pickup trucks and truck camper manufacturers this should be a farly easy task. But most truck don't fit in our garage and not every camper fits on every truck (far from it, actually), and there were a number of limiting factors to be considered. All of them could be different for eac individual. In any case we downloaded umpty brochures and looked at them and were thinking for quite some time about our plan of action.
( Posemuckel was traditionally the name of the small second car in my wife's family. It is also the name of a small town in Poland. How this came about, nobody knows.)
In summer 2008 we decided on a new Chevy Silverado 2500 HD 2WD with a regular cab and a long box. Its name is Posemuckel, and it fits exactly into our garage. The door needs to be pulled over the rear bumper on closing, it is a very tight fit. We bought it from a german importer without much hassle. For sure you can save a lot of money taking care of the import yourself. Or you might pay dearly for any knowledge gaps in the process. Anyway, we left all that to an experienced dealership.
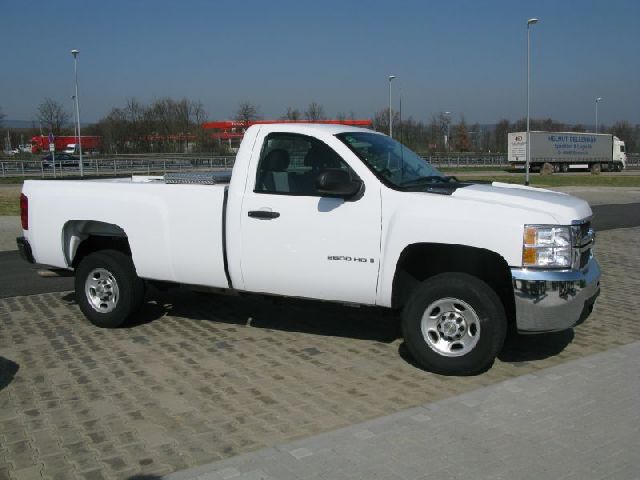
Figure 3 - the Posemuckel
Right when the truck arrived, an LPG system was installed. LPG is about half the price of gasoline per liter over here, so it cuts the fuel cost quite a bit. I get about 13,5 mpg on the LPG without the camper on the back. The buying process was really simple, and all the information we collected wasn't really needed for that.
Instead, it might have dawned on us that it would have made a lot more sense to buy a complete truck/camper combination in the US and bring it over here as one piece. That is, because a truck camper without a truck is very hard to relocate around the world. (can't just write an addrss on it and take it to the next post office, can you?).
Anyway. Having bought a brand new pickup truck, our financial reserves were pretty much depleted. As a result, buying a factory-new camper was out of the question. So we went and looked at the market for used campers. And looked. And looked. And found out that huge american campers for huge american long boxed trucks are in pretty short supply over here. In hindsight that comes hardly as a surprise: Fullsize pickup trucks are an exotic sight in this country, and so are truck campers, and as a result, the product of both can hardly be found around the next corner.
In late February, 2009, we found it became neccessary to move ahead. You want to get something out oof the season, and your camper won't be in the mailbox by tomorrow if you order it today.
Typically, in such cases, the german truck camper sets you up with a phone number of a forum member in the United States who can get these things for you and send them over. But be warned if you think about actually dialling that number. The guy really does that. And he is even rather active when it comes to it. We really only wanted to ask about the feasibility and technicalities of such a transaction. One hour on an iontercontinental phone line later (30 minues of which were needed to get a decent audio quality), we had bought our camper. It came from an ebay auction. A 2002 Lance 915 with air condition, electric jacks, but not much otherwise. In fact it took a few extra days to really complete the transaction, but the speed by which it all happened was breathtaking. Less than 6 weeks later our camper stood on a driveway in a small village near Wuppertal, waiting for us to pick it up. That's where the sion of our contact in the US who bought the camper for us lives. They import pickup trucks on a regular base, Doge Ram exclusively, and if they can they put a camper on the back of the truck on the way to Germany.
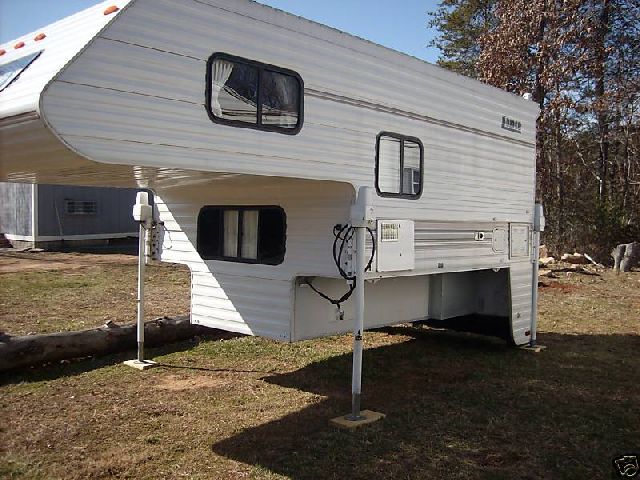
Figure 4 - the Bog Queen as it appeared on ebay
Picking up the camper was a very pleasant experience. There are a number of mighty fine people out there, Michael (aka Propane_Ram) and his wife Kerstin (aka V8Kerstin) are among them for sure.
Michael bolted the Torklifts underneath our truck and made a temporary electrical connection. Then he helped me to get our truck underneath the camper for the first time. Its was very tight fit. Then, in the middle of the night, we could drive the first miles (or should I now say kilometers, since we are in a metric country here) on narrow, winding rural roads. But we took this hurdle as well, and on the next morning we could drive our new nameless camper home and generally be very happy with our new mobile home.
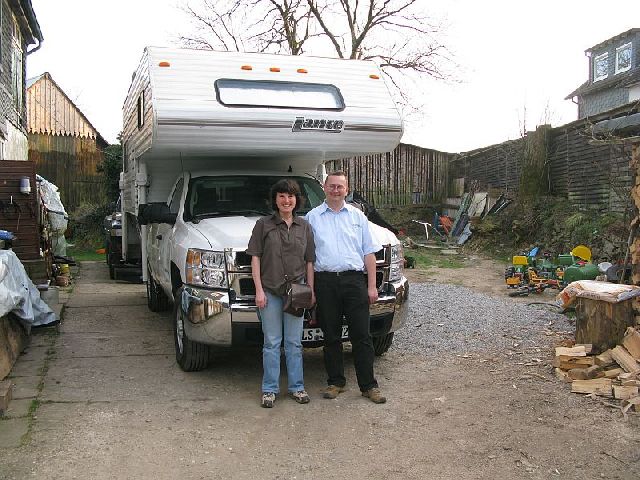
Figure 5 - Early April 2009. Picking up the Bog Queen. The people in front are the proud new owners
And this is where the story of the Bog Queen really starts. What can you say about the Bog Queen? She is exactly the type of camper we ad been looking for.The floorplan is perfect for us, it is not too big, not too heavy , but it has plenty of everything. She has a huge north-south bed and a decent bathroom. And she was very reasonably priced, since we were the only bidders on the auction and so we paid the minimum.
When we picked her up, our first impression was: This thing is huge. And then: This thing needs a good cleaning. And some of the seams need to be re-caulked. From the inside: Very clean, almost like new. Apparently it was quite well-kept. After all, it IS a Lance camper, and those are tough. It can't be a bad buy, our minimum-ebay-bid-camper-bought-in-a-foreign-country-without-looking-at-it-beforehand. And minus any warranties, obviously.
Only in one place you could see some strange looking wood. When you opened the cargo door in the rear. But it didn't smell bad, and everything looked rather solid. And in addition, and this would be an important realisation for the coming weeks: If you buy a truck camper in the United States through ebay without ever looking at it you need not imagine any possibnility to retrieve your money or any other type of compensation from anyone if anything is wrong with the product. There is only one direction: forward. We knew this when we ordered. But we understood the meaning only when we had arrived at home and looked closely at our newly acquired camper.
The floor next to the entrance door was somehow softer than the rest. Similar to the cargo compartment. The one where the wooded looked a bit strange, if you remmeber. One cut with a cutter knife brought clarity: Bog. Moor. Compost. Mulch. Fungus Paradise.
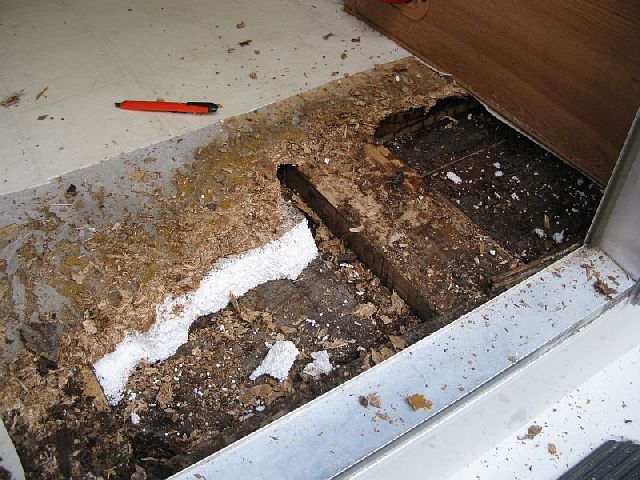
Figure 6 - the floorboard was a little soft to the touch...
Eventually, the rearmost 10-12 in of the cabin floor were gone. Thoroughly. You could put them on the compost pile straight away, and without the need for any tools. The passenger side looked worse than the driver's side, but both looked bad. Apparently the upper edge of the cargo door had been leaking. For a long time. The caulking had separated from the camper hull, and any water running down the rear wall was collected and directed into the floorboard. In addition, similar problems were present al all doors around the camper, but none was as bad as the rear cargo door. The entrance door, by the way, seems to have been sealed very well.
In the meantime I had learned from the very helpful Open Roads Forum on www.trailerlife.com (http://www.rv.net/forum/Index.cfm/fuseaction/thread/tid/20593577.cfm) that the side skirts on these models are also very prone to rot. They are made from rot-friendly light wood and rot-friendly OSB. The ingenious engineers have optimized the design in such a way that many long, delicate seams can let water in, from where it will never ever find the way back out. Alas, the skirts were rotted out. Gone. No longer there behind their aluminum sheeting after they had become a feast for fungi.

Figure 7 - the side skirt could be disassembled manually
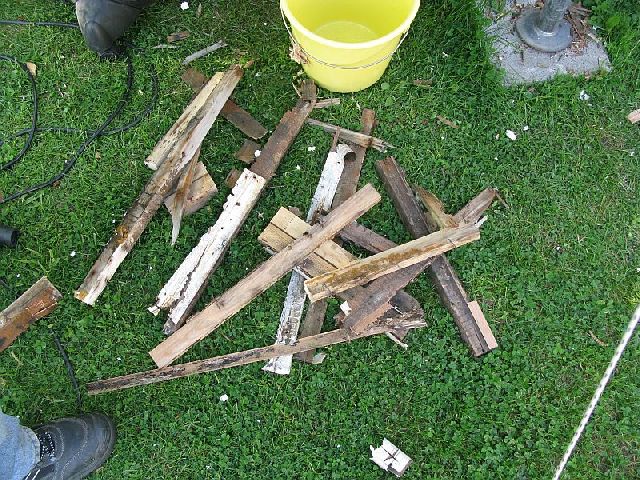
Figure 8 - Barbeqeue with the Bog Queen
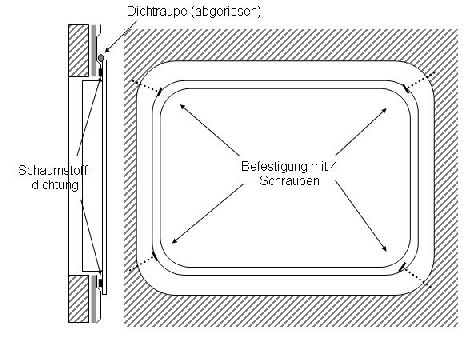
Figure 9 - how the cargo door is installed
The illustration on the left shows the design of the outer walls. A wooden framing is filled with glass wool. On the outside there is some sort of styrofoam layer for insulation. On top of that comes aluminum siding. The door is mounted from the outside and sealed by some kind of foam strip. The outer seam is then sealed with silicone.
The door is fixated by just four screws in the corners, but they do not press the frame against the outer wall. They rather just suspend the frame in the opening. If the outer silicone seal tears off, which can happen very easily with this design, any water running down the rear of the camper is directed into the wall and floorboard. From there it can not get out again. The traverse beam in the rear is packed rather tightly from all sides. Water that gets in there stays in there.
Generally, the cargo door any many other places are sealed rather careless agains water entry. The frontal wall of the cargo bay, which is subject to water spray when driving, had several holes and seams which apparently never had been sealed properly in our camper.
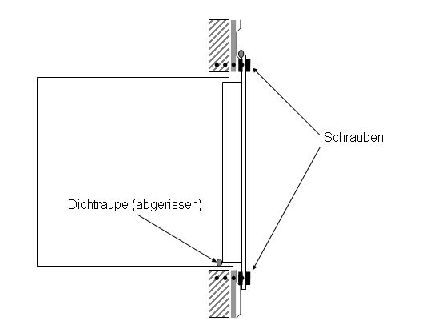
Figure 10 - Design of the battery box door
It is particularly perfidous when a design is watertight on the outside, but when the compartment itself is not 100% watertight and there is an undercut at the lower edge which will collect any water that needs to leave the compartment. Any water that enters the battery box (and it must be a significant quantity judging by the traces of dirt I found in the box) is then collected in the wall framing below. This is also not unique to my camper, there is at least one thread on the topic in the trailerlife forum. And it is not just the battery box; the LPG compartment has a similar design.
The undercut is sealed with some silicone from the inside which had pulled loose in my camper. Thus, the wood below both compartments was wet - but fortunately had not disintegrated yet. The water entering through the battery box had a major part in the destruction of the drivers' side skirt.
Many such design solutions can be found throughout the Bog Queen. This is not to say that the overall design is inherently bad or that contruction of our camper was particularly careless. To the contrary. In many places the camper sports ingenious craftsmanship. And as far as the usage of space is concerned, the camper is thought out extremely well. And Lance doesn't really seem to have a bad reputation. You can expect to get at least average quality for your money. But this design was State of the Art at the turn of the century and it has not significantly evolved since. Many campers sold today are still built this way. And as long as it is watertight, the design works very well. It is inexpensive to manufacture, light and durable.
However, not every detail of the Bog Queen received the same attention. Places that can not be seen in the finished product, like this taillight housing, show signs of cost-cutting you would not expect to find in a commercial product selling at 20000$:
Figure 11 - Misplaced your drill? Creative hole behind the taillight
Now we had to dry up the swamp. Everything that was rotten needed to come out. Unfortunately this meant removing the rearmost foorboard beam. A lot of disassembly is needed to get there, since it is surrounded by other components on all sides and carries the rear bumper and a holding tank with parts of the plumbing.
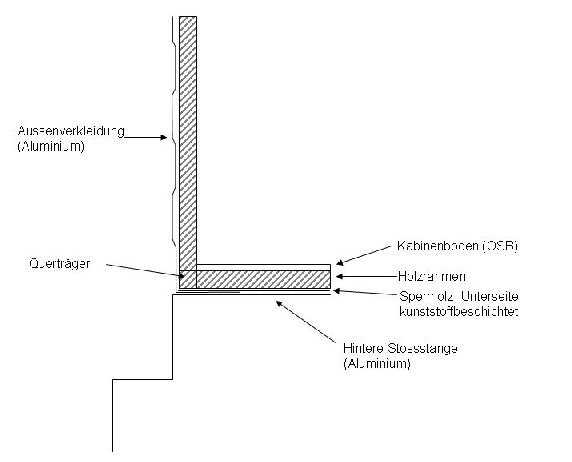
Figure 12 - the aluminum siding was cut at the lower corner
To repair the damage it would have been best to remove the bumper, since the siding is trapped between the frame member in question and the bumper. And the siding needs to come off in order to do anythimg. But to remove the bumper we would have needed to drop the holding tank which hangs underneath ist. And that would have meant to tear apart the perfectly servicable plumbing.
Since the plumbing parts are glued together and I didn't really care to tear up the whole system I decided to leave the bumper in place and cut the siding at the lower edge instead. Even it that is not a very pretty solution.

Figure 13 - this will cut holes into everything. really..
We purchased a Fein Multimaster oscillating saw to help with disassembly. This tool proved to be a real help in the project. With the multimaster, a hammer and two chisels I was able to remove the rotten beam and make a clean cut in the rotten floorboard. It also comes in handy when cutting holes into the walls for inspection. A cover screwed over a hole in the wall looks a whole lot better than water damage that develops undetected.
We had been looking for water resistent wood for the repair. Even if the camper should not leak any longer after we repaired it, I felt safer knowing that a new leak would not cause trouble any time soon. We went to the local lumber yard, but all we could come up with in terms of water resistant wood was tropical Bangkirai. That, we took. I never want to replace that beam again!
So the framing in the rear was rebuilt using pieces of bangkirai. Numerous steel braces and a gazillion screws now keep the rear end of the Bog Queen in shape.And Sikaflex. It would be best if the whole camper was molded from Sikaflex. At least it wouldn't leak anymore.
Figure 14 - both side skirts and the floor beam are removed
The rotted plywood that makes up the lower floorboard was reinforced with fiberglass mats and epoxy. Typically I don't care for that type of repair technique, but it seemed to be the better option compared to replacing everything. Especially since the holding tank beneath was still in place...
The space between the in the floor frame was filled with new styrofoam blocks. Then new pieces of plywood were screwed on to to replace the rotten OSB floorboard where we had to remove it. I painted the frame with wood preserver before I closed it up again. Hopefully that will help to prevent further rot. All edges were sealed with Sikaflex. In a couple of years we will see how much it helped.
Then we put back the aluminum siding which was reused after all remnants of the old sealants had been stripped off.
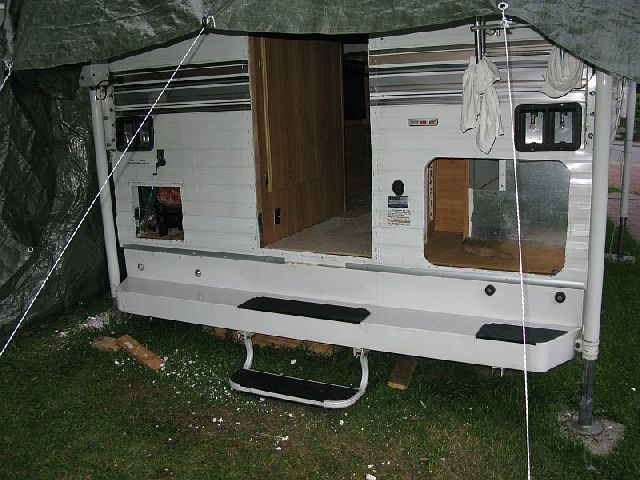
Figure 15 - getting there - the siding is back in place
The lower edge which I had to cut open is nopw covered with an additional molding strip.
The old PVC floor had to be partly removed in order to replace the rotted rear section of the OSB floorboard. It was replaced with standard PVC flooring from the local home improvement store. But first I needed to remove all of the old floor, which consists mainly of some sort of cardboard which is glued to the OSB floorboard with a lot of very sticky adhesive. Much of the cardfboard most of the adhesive stays with on OSB when you tear out the old floor. I used a multimaster tool to painstakingly remove as much of the old stuff as possible. If I had to do it again, I would just lay the new PVC floor on top of the old one. To avoid a step at the separation line between the old floor and the replaced section I would just use some cardboard or similar material of the correct thickness.

Figure 16 - the new floor, still missing the trim
The old trim piping had to be cut away and was later replaced with a triagular fillet. The new PVC floor is glued in place with regular floor adhesive (whatever that stuff is, we got it together with the PVC). Since the old floor did not come out in one piece, we had to measure the area as exactly as possible. Then we drew the outline on the back of the new floor and cut it to shape as closely as possible before laying it out. The old sticky adhesive on the floorboard makes any adjustments difficult. And I still don't know how I could get rid of that stuff.
The side skirts were rebuilt from composite board (fiberglass/foam/fiberglass) which I obtained from a local truck body shop. The owner of the body shop was nice enough to come by our place and have a look at our mobile swamp and give us some tips on best practices. The new skirts can probably still draw some water, but for sure they will never rot again. I sealed the edges with plastic profiles which I epoxied in place. Eventually they were sealed again with Sikaflex after installation.
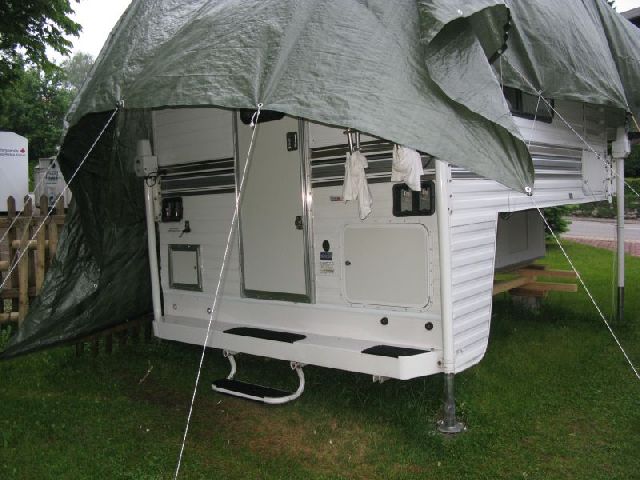
Figure 17 - Skirts, Doors - the Bog Queen heals
The cargo door was where the main leak was. In order to install it watertight, I decided to drill holes around the frame and screw it against the rear wall. Between the frame and the rear wall I used some permanently plastic putty. After installation, I sealed the seam with Sikaflex.
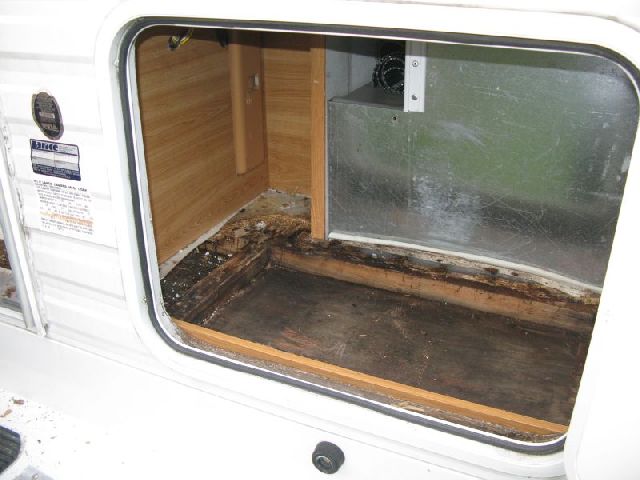
Figure 18 - the cargo comp before the whole procedure. OSB board already removed.
The very similar door of the LPG box was removed and reinstalled in the same manner.
Some of the outside compartments have undercuts on their inside lower edges. These undercuts are sealed by Lance with a generous helping of silicone. But if water enters the compartments, and the lower edge seal is compromised, the water will leak into the framing from behind. To eliminate this issue I cut some pieces from aluminum "L"-strips and screwed them against the inside lower edges of these compartmets, along with Sikaflex to seal the joint.
A similar situation exists in the refrigerator compartment. The compartment door has no seal and water can enter rather feely. The lower edge of the compartment is a wood frame member. The wood frame member carries, on the inside, the refrigerator base board. On the outside it carries the refrigerator compartment door frame. Between the base board and the frame, there is about a 1/2 inch gap. This gap is filled with a little bit of sealant, which was brittle and loos in our camper. The wood underneath had started to rot, but was still structurally sound. I bridged the gap with an aluminum strip, a lot of sikaflex, and some screws.
After all damage had been repaired, many seams had to be recaulked. We decided toi remove any caulking that looked suspicious. Sections that looked to be in very good condition were left in place for the time being. Once you have the right material (we used UV proof Sikaflex), the problem with recaulking is that you would like for it to look nice. Earlier experience with the bathtuib at home made me dread this job. I did not want to smear the new caulking all over the place after investing so much work.
Professionals use caulking pistols that work with pressurized air. I only had the standard manual squeezing press and idn't want to invest into more professional equipment. I did some research on the web and couldn't find much useful information. Eventually I turned to the company that had provided the Sikaflex to see what they had to offer.
They sold a special tool for under $2 which closely resembles something I have seen in my kitchen before. So I ordered that and tried it with good success.:
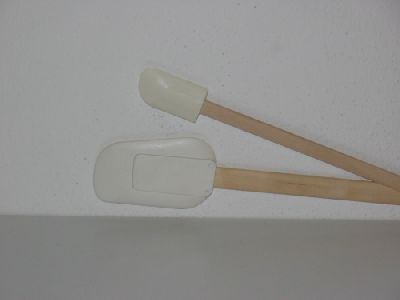
Figure 19 - „special“ tool for caulking
I decided to tape along the seams before I applied the caulking. It is rather time-consuming, but for a beginner like me it proved to be a good idea. After the tape was in place, I applied the new Sikaflex and smoothed it with the special tool. Typically, if you are a beginner like me, you will use too much sealant which you must now get rid of. Keep a lot of kitchen rolls at hand, and Sika remover, too, while you are at it. And please wear some old clothes, since they will invariably get Sikeflex on them.
And make sure you get a good supply of your favorite masking tape before you start the job. I ran out of tape under way and had to scrounge the house for any tape that I could still find to continue my work. Remove the tape as soon as possible. Work in sections, from top to bottom. And take your time. It gets easier which each new seam...
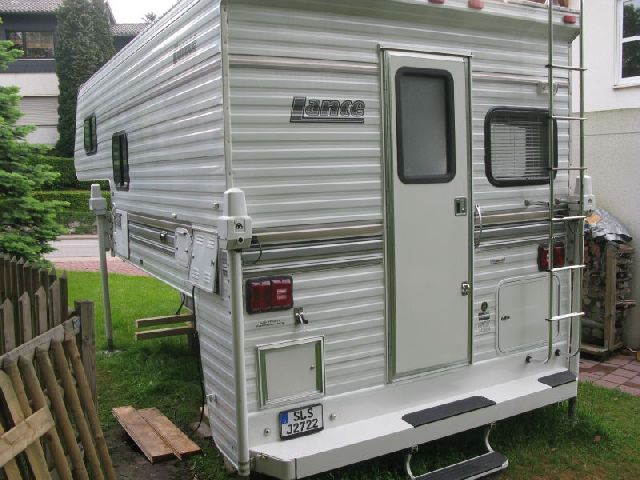
Figure 20 - after one day of caulking
This method worked for me. Let me know if you found a better one. I have still some work waiting.
Overall, we spent more than $2000 in parts and materials for the repair job. These were sealants (Sikaflex, silicone, plastic putty), costruction wood, hardware (screws, aluminum profiules), new floor, insulation, and a lot of odds and ends. Also about $500 for a luxurious Fein Multimaster tool set, which was well worth the investment for me in terms of time saved and motivation gained.
We also needed a new mattress which did not come with our camper, and new cutains which didn't hold up to our washing machine very well (in fact some of them just disintegrated, probably due to UV exposure).
The seat cushions were stripped and the covers washed. Cushios and covers were in a good state, so no additional work was needed here.
The total work was much more than we had anticipated. In the course of six weeks we spent about 200 hours with the project before we could take our Bog Queen on her first trip. And still we need to adapt the electrical system (110V in the US vs. 240V here) and the LPG system (different tanks and hardware).
What should you buy? Americn truc campers or european ones? Wood or aluminum or composites or fiberglass? Or maybe even a standard run-of -the-mill class "C" motorhome?
I really don't believe I can give any meaningful advice on that. If youtalk to owners of other truck campers, and if you look into the relevant internet forums, you will soon find out that there can be issues with every concept. Even a fiberglass shell can have a major rot issue, since so much wood is used inside. My very personal opinion is that the type of usage, care and maintenance have more influence on the state of a specific camper than the choice of materials. I concede that the standard wood frames probably need more maintenance in the long run. I am not very thrilled with the idea of a camper made of cheap lightweight wood. But other materials have their own disadventages, too. For instance weight, ease-of-repair, price, fatigue cracks, delamination. And a leak that is allowed to go on for any extended time will always cause issues.
I also believe that a product as complex as a truck camper, with many different loads and stresses, cargo doors and window seams and so on, can ever be watertight for an extended period of time without regular maintenance.
However, in all campers I have seen so far, it was extremely difficult to detect leaks. Our Bog Queen had a major rot problem which was all but invisible. There was no smell. There were no water marks. The usage of plastic covered materials allows a lot of rot to go on before anything becomes noticeable. And when you can see it, it is much too late in most cases. Only by disassembly of components did it become possible to identify and assess any water damage. So if I had one wish I would like the TC manufacturers toi come up with a way to spot water in the specific places where it ususally accumulates first: Along the lower edges and under the windowsills. If there were some inspection openeings which could be taken off frequently that would probably help to spot many issues in due time for an inexpensive repair. I cut several such openings in the inner walls. Hopefully they will help me to detect the next leak in time before significant damage has occurred.
And especially the american campers could be made with just a little bit more attention to detail in some cases. I found a number of details which were starting points for programmed self-destruction. A door of the size of the rear cargo door might be affixed with more than four screws, for instance.
But it is also the handcrafted, robust engineering of American TCs which we like so much about our Bog Queen. I would buy another American TC. However, I would probably not buy it blindly through the internet. The time and money spent on the repair could have been spent on a trip to the US. On the other hand, we can not be sure whether we would have found the perfect camper there. Now, after going over our camper with the fine-toothed comb, I would know what to look for. Two months earlier, not so much. We contatced the seller, a couple in their seventies. They were genuinely shocked about teh state of their camper. They had not had the camper for very long and said they did not know about the rot. And I have reason to believe them.
Besides, the Bog Queen is just the camper which Janina and I wanted to have. There is no comparable product on the market in Germany. And that makes the whole discussion moot. We got what we paid for (and wanted to have) -and everybody else needs to decide for themselves what they want.
In any case, we are Happy Campers.
Please
feel free to contact us any time
joerg <at> walzenbach <dot>
de
janina <at> walzenbach <dot> de
Fein Multimaster - www.fein.de
Pickup-Wohnkabinen-Forum (german): www.pickup-wohnkabinen-forum.de
Trailerlife Forum (english): www.trailerlife.com/cforum/Index.cfm